Search This Blog

Friday, June 1, 2018

My Skincare Routine


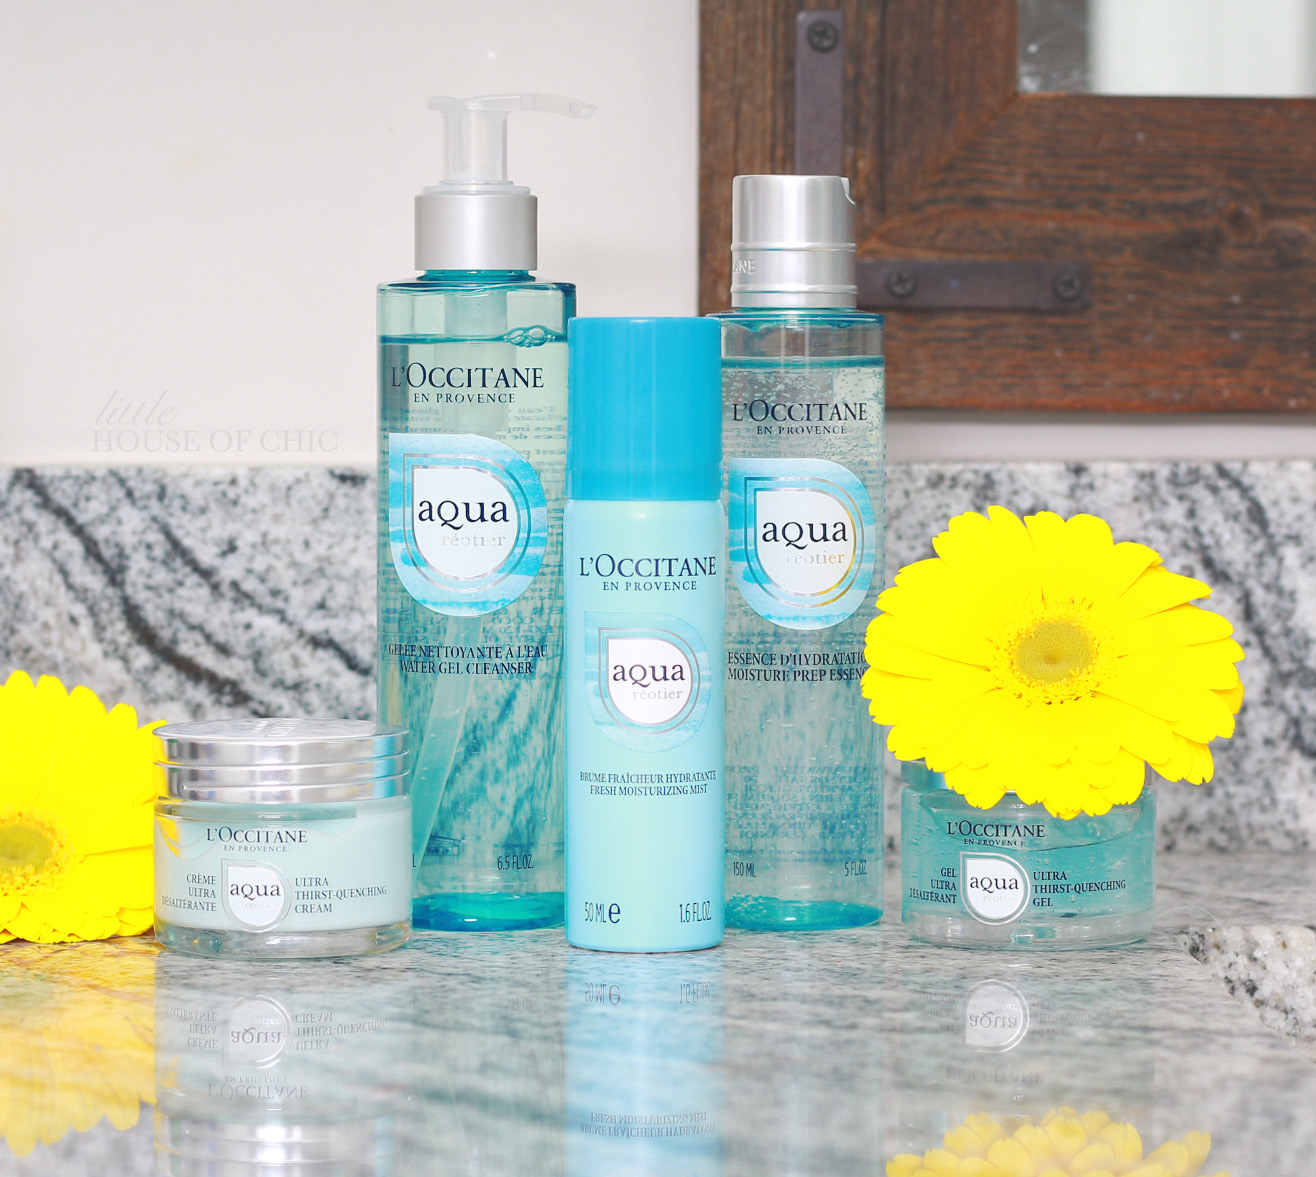
 I would categorize my skin as dry, so I am always seeking out ways to keep it hydrated. In this summer heat and humidity, I needed to allow my skin to breathe, which meant hydration without an oily base.  My mother turned me onto L'Occitane products years ago, and I have always loved their skincare. Recently, I discovered their Aqua Reotier collection and decided to give it a try because it is  a non oil-based product with intense hydration. 


Unlike other beauty products, this one started working for me instantly. Most noticeably with my skin's firmness and hydration. I use the five-step collection in the morning, and the moisture lasts with me throughout the entire day. I start by cleansing my face with the water gel cleanser, and then apply the moisture prep. After, I follow with the ultra-thirst quenching cream, which smells divine. A little bit goes a long way so a container should last you quite a while. Once I've moisturized with the cream, I come back over my face with the moisturizing gel and allow it to soak into my skin. 

The mist is one of my favorite products from this collection because it is great to have on-the-go to achieve a dewey look with or without my makeup. All of these products smell heavenly, and I get complimented on the fragrance.

My skin feels so radiant from using these products and is giving me the confidence to go out without makeup which is a long-held goal of mine. My skin not only looks great but it feels extremely soft - just what I was looking for.


Thanks to L'Occitane for sponsoring this post.


Wednesday, May 30, 2018

Chalk Paint Tutorial


My YouTube channel is finally here! Guys - I have been working on video content for a year now. I would film small clips of myself decorating or explaining wine to you, but I eventually deleted them and decided not to share because I thought they were low quality. I finally decided, who really cares if my videos aren't award-worthy? I'm going to film and share them anyways. ;)

I found a dresser on Facebook marketplace for FREE! I was the first person to contact this lovely lady and somehow scored this amazing find! I loved the way it looked when I got it, but the top of the dresser didn't match the original wood, there were paint drops in odd places...overall it needed some love. I decided to chalk paint this piece. 

Ya'll...confession time....this is my very first time using chalk paint. I watched a few videos and read a few articles and decided I wanted to make my own tutorial. Everyone has their own style, and I wanted my paint to look slightly aged and dimensional. 

I started off with two paint colors: an off-white and a light gray. I ended up purchasing a third color that was about 5 shades darker than the gray color, in order to achieve the distressed look I was going for. Once I was finished with my paint, I took a sander to the edges of drawers and the sides of the dresser to, once again, achieve an aged look. In this video tutorial, I will show you how to sand, paint, add dimension, and finish a piece of furniture using chalk paint.


Thursday, May 24, 2018

Patriotic Table Decor


Ahhhh Memorial Day. It feels like the unofficial first day of summer. Usually my husband and I go to the lake or the beach for the three day weekend, but we have been traveling so much recently I needed some time at home. 

I am a sucker for holidays because it's a great excuse to host friends and decorate the house! This year I decided to spend the holiday out on our porch. I recently slapped a new coat of paint on it to brighten it for the summer. It was so drab before...the dark red floor and brown siding made the area feel like a cave. Ever since we (I) painted it, its been so bright and airy. 


Rather than using cheesy decor covered in stars and stripes and super bright colors, I decided on soft pops of patriotic colors. I wanted to add at least one element of the flag, so I decided on red and white striped napkins. I found a full set of these hand-blown blue goblets at HomeGoods (shocking, am I right??). I love adding gold accents to almost all of my home because reflective elements add shine and make the other room items glow.

I added height to the table arrangement by using large glass hurricanes and pillar candles. These are great because they are functional as well as beautiful. When the sun goes down, you can enjoy a candlelit conversation. 

I think someone is a fan of this space ;) .

You can save up to 30% off Pottery Barn by using code: SAVEMORE this weekend only. My napkins and placemats are from Pottery Barn and linked below!


Sunday, May 20, 2018

How to Dye Leather Furniture


Recently, I began updating my husband's office. He works from home so I really wanted to create a nice environment for him that was masculine and timeless. Let me just tell you, it was BAD before I began working on it. He had a rickety desk with no drawers, a matching printer stand that wobbles every time he would print something, mismatched artwork, and a multi-color poster of the United States that looks like it belongs in a kid's room.

His current desk chair was given to us by a family friend, and was somehow missing a chunk on the armrest. It worked well for a while, as it is comfortable, but it was such an eye sore. With my current obsession with the decor from Patina Farm,  I really wanted to get him a great looking leather desk chair. They are so timeless and comfortable. My hope was to purchase a chair I found on Wayfair that had the perfect aged look to it. That was until I found this chair on Facebook for only $25...


This chair is 100% genuine leather, has a brass base, and is 40 years old. SCORE!

The picture on the internet made it look like the color was much more rich than it was in person. Although the color looks halfway decent in this picture, in person it was super outdated ('80s) and looked like the color of mud....not a good look.


The chair needed some love.

I started doing research and found that you can actually dye leather furniture. I couldn't find very many good tutorials on how to do it and one of the brands that many bloggers talked about from the past is no longer existent. Ergo, more research on my part.

There are 3 basic things you will need to dye a piece of furniture:
1) Deglazer (essentially this is acetone)
2) Leather dye
3) Sheen finish

My first task was to pick a color. I had a lot of anxiety over choosing the color because I didn't want the chair to be too dark. The swatches in the store were painted on a raw piece of hide, so how would it look on my already dark chair? The sales person suggested mixing two dyes together to achieve the color I wanted, but I ended up going with the color medium brown. Lucky for me, the dye remained true to color.


I am so happy I ended up going to a leather store instead of ordering them online because the colors looked so much different in person! 


For my project, I ended up only needing one, 4 oz bottle of the dye, one bottle of deglaze, and one bottle of the sheen.


Here's the chair mid-dye...looking pretty good if I do say so myself.

And the finished product!


HOW TO DYE LEATHER FURNITURE

Materials:
Deglazer or acetone
Leather dye (they come in 4 oz. and 32 oz., this project only used 4 oz.)
Sheen finish
Rags
Dye applicator (my brand came with one)
Drop sheet or paper
Rubber gloves

Instructions:
For my project, I wanted this chair to look like a true antique piece, so I distressed the chair before I dyed it. To simply dye the chair, start the video at 3:15 to see me select my dye color in the leather store. 

This video was taken from clips of my instagram stories while I was dyeing the chair. 
Better quality video DIYs to come ;)


Wednesday, February 14, 2018

Our Wedding: Old Hollywood Meets Southern Opulence


 In honor of Valentine's Day, I thought I would share our wedding day with you all!

Garrett and I had been dating for four years when he proposed. He got down on one knee at Canoe in Atlanta, a beautiful river-front restaurant on the Chattahoochie. Once we were engaged, I started planning the very next day.

 I desperately wanted to get married that summer, and with it being only 9 months away, I felt behind just getting started. My mother came into town that week and we started shopping venues. Originally I wanted an outdoor wedding (thank goodness we didn't because it rained on our wedding day).
I found a gorgeous spot an hour north of the city that was perfect. I kept my mind open, however to other options. One day, I had a venue in Buckhead cancel my appointment a few minutes before I was to arrive. I pulled into a parking lot and started making calls to visit another venue that could meet on such short notice. That's when "the one" fell into my lap. The gorgeous, 4-story, castle-esque Women's Club of Atlanta in Midtown welcomed me with open arms and gave me a tour within the hour. Walking through the space, I realized that everything I had desired in a location was met. It had a gorgeous bridal suite, a room for kids to stay in during the wedding, charming grooms suite, grand pianos on two floors, and arched windows in the ballroom. I was in love. So much so, I wrote a check for my deposit right then and there.

I planned my entire wedding without the help of family or a planner and it was exhausting.  We invited 250 guests and had 200 at our wedding. Planning a wedding this size takes a lot of work and a decent chunk of change. My budget was relatively small compared to the industry standard, but I stretched every dollar I could to pull off a glamorous wedding.

In order to save money:

  •  I created my own centerpieces and purchased my flowers from a wholesaler (savings of $5,000)
  • I purchased inexpensive wine from Trader Joe's and relabeled them with our custom label (savings of $2,000)
  • We purchased a keg instead of individual bottles and served the beer in glassware provided by the caterer (savings of $400)
  • Instead of getting carried away with our invitations, I ordered them through Vistaprint and received free envelopes with my order (savings of $1,500)
  • I DIYed several elements of our details including signage around the room, our bar menu, rehearsal dinner invitations, groomsmen and bridesmaid gifts, and so much more. (savings of around $1,000)
  • Instead of a band, I hired a piano player and saxophone player (savings of $7,000)
  • Instead of a DJ for the after-party, I hired a DJ ahead of time to make a mix for me which only cost me $150! (savings of $1,300)

One of my favorite elements of our wedding was our cake! I wanted it to be a statement piece, and that is was! Sitting at 5 feet tall, it was extremely intricate and carefully planned between my cake baker and myself. I created the poetry for the bottom of the cake in photoshop and using her edible printer, we were able to have delicate script on the cake which was absolutely gorgeous and such a sweet detail that I still get teary-eyed reading. We incorporated our flowers into the design as well as our initials, and to keep things looking polished, I asked for gold jewelry-looking "drips" throughout.

Another element that wasn't photographed that I loved from our wedding was our champagne cocktails. We named them the "East Cobb Snob" and the "Buckhead Betty" (it's an Atlanta thing). The Snob was a champagne cocktail with a splash of St. Germaine and the Betty was a champagne cocktail topped with cotton candy on a pearl-ended cocktail stirrer. In the bar area, I played classic old Hollywood movies on the back wall to keep the theme alive. Scattered throughout the house were quotes from Fitzgerald (one of my favorite authors), sitting in pretty gold frames.

A special moment happened while we cut our cake. One of Garrett's groomsmen sat down at the piano and started playing the prettiest music while we tried to cut the cake without toppling it over! It was so unexpected and beautiful, it will always stay as a special moment in my mind.

You can see all of the details of our wedding below:

We started off our morning getting out hair done at DryBar


I used a cartoon artist on Etsy to create this cute caracture of us for our sign

I DIYed this bar cart by purchasing old cigar boxes from a local shop and ordered custom matches

I had a florist construct these precious kissing balls for our flowers girls using mums and a champagne ribbon.

Orchids are my favorite flower! I wanted to keep things simple and elegant by only using white orchids. I loved the way the gold chivari chairs made all of our decor pop!

The flower girls wore blush pink dresses with crystal accents...isn't she adorable?!

For the groomsmen, I purchased cut crystal lowball glasses from HomeGoods, and placed an airplane bottle of nice bourbon and a cigar in each. This way the boys get to have a drink without going overboard!
Tip: if you buy them in a pack instead of individually, they are much less expensive!

My nephew came to see me before I walked down the aisle!!

The bridesmaid dresses were blush pink with beautiful open backs. I wanted their dresses to look like a gown they could actually wear again!

For the guys, I selected ivory suit jackets with black slacks, bow ties, and vests. It just screamed old Hollywood to me!

For my bouquet, I attached small frames with pictures of loved ones we lost so they could be there in spirit. When I showed my Grandmother the image of my grandpa she started crying because she was so touched I included him. I loved being able to honor them without drawing a lot of attention.

My "something borrowed" was my sister's veil. It matched my dress perfectly.

For our first dance as husband and wife, we played You Are the Best Thing by Ray Lamontagne.

Three generations

I loved the saxophone player! He was such a hit!

Carlton's Cakes in Atlanta made this gorgeous masterpiece!


Some of the poetry I selected for my cake. I did a montage of different pieces from Fitzgerald.

Scariest moment of my life right here, folks. My husband wouldn't touch it because he thought he would tip it over!

Garrett's groomsmen playing for us while we cut the cake and did our toast!


Because we used a historic venue, several send-offs were off limits to use, including sparklers. Instead, I purchased dried rose petals on Etsy and used old sheet music wrapped into a cone to hold them. I love how the images turned out using the petals!

It's so fun to go down memory lane and look at images from the day I said yes to my soulmate. If you have any questions about where I purchased items, how to save money for your own wedding, or simply want to tell me what you think, please let me know in the comments!

Happy Valentine's Day!!


Monday, January 29, 2018

Easy French Toast


Valentine's Day is quickly approaching and it has me thinking about food! My husband's favorite meal of the day is breakfast, and while I don't make an extravagant breakfast for him on the daily, I do like to spoil him from time-to-time with my homemade french toast. 


The key to making good french toast is all about the bread. While you can use several types of bread to make french toast, the best is soft, brioche bread. It is spongy, thick, and makes for a great texture. It also has a little natural sweetness which compliments this sugary breakfast. Another key to making perfect french toast is the amount of egg wash you use. I've made the mistake in the past of allowing the bread to sop up a ton of liquid which results in a less than desirable result. To achieve the perfect amount of egg wash to bread ratio, coat your bread on each side with the egg wash and then transfer it to your skillet. Adding too much will make the bread soggy even after toasting. I like to use half & half instead of milk in my mixture for a richer flavor. 

For garnish, I usually use fresh berries, chocolate, and powdered sugar. I recently discovered an amazing addition to this decadent breakfast - chocolate covered pretzels. Yep, you heard me right. It is amazing. I crush up the chocolate covered pretzels and sprinkle a little on each piece of toast. It gives the perfect amount of crunch and adds a little saltiness to balance out the sweet! Let me know if you try it out. ;)


French Toast

Preparation:  5 min  Cook Time: 10 min Total Time: 15 min

Ingredients
        
          6 slices of thick bread
          3 eggs
          1 cup milk or half & half
          1 tsp vanilla extract
          1 tsp cinnamon
          Butter for frying pan
          Maple syrup
          For garnish: walnuts or pecans, raspberries, shredded chocolate, powdered sugar

Instructions

          1) In a large bowl, whisk the eggs with the milk until well combined. Add the cinnamon and vanilla.
          
          2) Dunk your bread into the mixture and turn until the bread is coated, but not soaked.

          3) In a frying pan, melt butter to coat the pan on medium heat, about 1 tbsp per 2 bread slices. 

          4) Cook each side for 3-6 minutes, or until golden and toasted.

           5) Transfer each piece to a plate and layer them down the plate so that each piece is exposed.

           6) Using a strainer, pour your desired amount of powdered sugar into the strainer and dust over 
                 the bread.

           7) Garnish as you like and top with syrup.


Enjoy!


DIY Abstract Artwork


Now that our home is finally coming together, I have been hunting for artwork. Our walls feel so bare. I think for a lot of people, myself included, choosing artwork feels very intimidating. You may fall in love with a piece and find it doesn't go well in the room at all....or it makes the room feel dark, or it's too colorful, or it doesn't have enough color. Then you're out a hundred bucks because you can very seldom return original artwork. I've searched several online retailers for artwork but never seem to find anything I like. I'm a fan of abstract art, but most of the pieces I am attracted to are several hundreds of dollars. Bummer.

I kept buying mirrors to fill up wall space, but too many mirrors in your house will make you look a little self-obsessed, am I right? I started hunting for pieces I liked and noticed a trend in my selections. I clearly was in love with black and white simple abstract pieces like the one below. They go everywhere, even in a room filled with brown, and they add understated elegance to any room. Mixed with black and white photo pieces as a gallery wall, they match effortlessly. 

(Source: unknown)

I decided to paint some of my own. I wanted to use watercolors instead of oil or acrylic paint because abstract watercolor paintings tend to have a messy look, which would result in my own rookie painting looking "professional." I grabbed gold frames with a matte included from Target. Using 6x8 inch watercolor paper, I grabbed some black watercolor paint and started painting imperfect circles.


I decided to paint a few pieces with different ideas in mind, and picked my two favorite to hang in the frames. The paint takes about 1-2 hours to dry, but I waited a full day to allow the paint to dry before putting them in my frames.

My recommendation is to make each painting different, but stick with a theme. My theme was circles, so I painted some with large circles, some with little circles, some where they fit to the size of the media and some where the circles went off the page. Don't feel like there should be an exact way you make your own. The beauty is, you can make several attempts and you only have to pick a few to go in the frames! I think this project could be fun as a girl's night with a glass of wine. Who knows, maybe the more you sip the better your abstract will look! However you artwork turns out, it will be your own one-of-a-kind masterpiece!


Copyright @ Little House of Chic. Blog Design by KotrynaBassDesign